I’ve been wearing varying shades of brown nail polish for the last few weeks in anticipation of FALL! I just love the change of the seasons. After living in Arizona for so long and having only a long summer and short cool-ish season, I just love anything that changes. I find myself excited for whatever season is next.
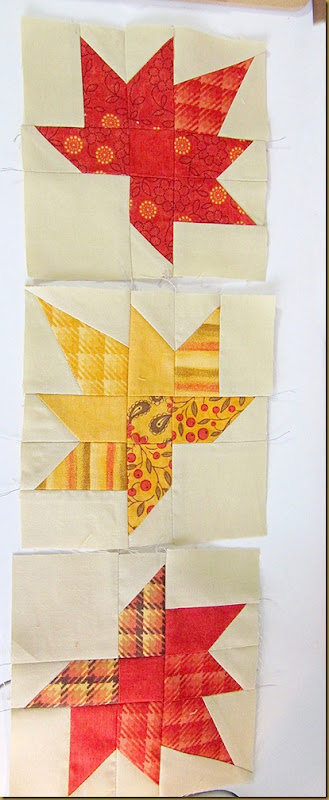
I had this lovely charm pack from Sandy Gervais. I love leaves and thought I needed to magically turn the charm pack into leaves.
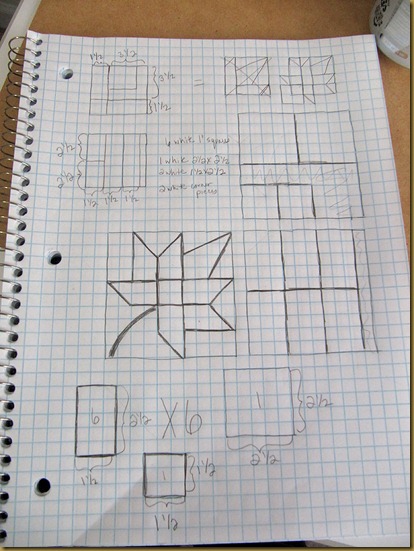
I sat down with my notebook and came up with this. For each leaf you are going to need:
2 - off white 2 1/2” X 1 1/2” strips
6 – assorted printed 2 1/2” X 1 1/2” strips
1 – printed 2 1/2” X 2 1/2” square
1 – off white 2 1/2” X 2 1/2” square
6 – off white 1 1/2” X 1 1/2” squares
2 – off white diagonal pieces
1 – assorted printed 1 1/2” X 1 1/2” square for the very center
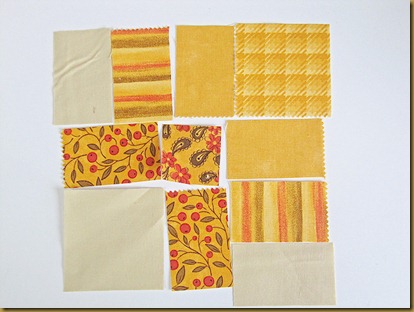
From one charm square you can cut 6 – 1 1/2” X 2 1/2” strips. Cut several and them mix them up if you want it sort of scrappy like I did them.
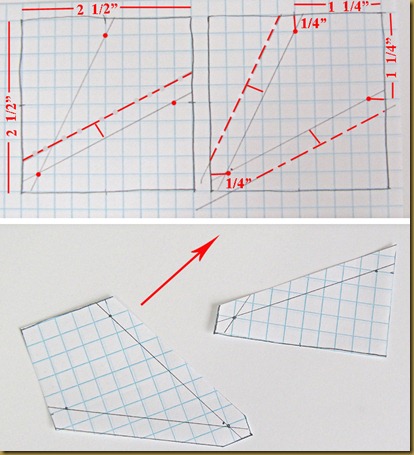
I made a template to cut the tip of the leaf. I drew a square that was 2 1/2” X 2 1/2”. I measured over from one corner 1 1/4” and 1/4” down and put a dot. Measure the adjoining corner the same way and put a dot. Diagonally in the corner, measure 1/4” in and put a dot. Connect the dots. With your ruler, add a 1/4” seam allowance. This kite shape is what you will cut your patterned 2 1/2” square with.
The second template is for the off white triangles. I drew the same basic shape out on a 2 1/2” square grid. This time, I used the bottom angled piece and added 1/4 seam allowance to it and cut it out. For each leaf tip piece, you need to cut two off white pieces of this shape.
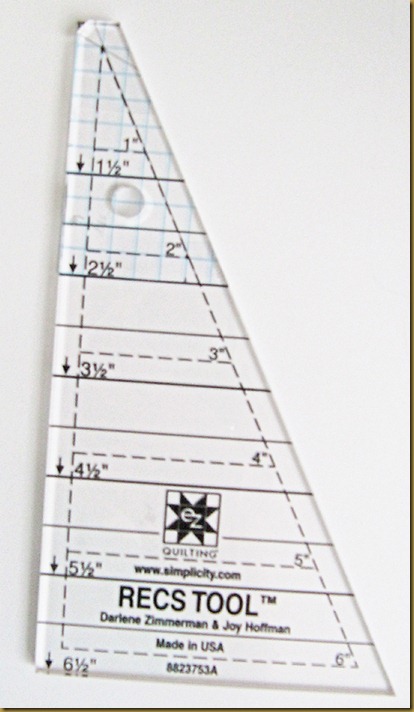
If you have the Lazy Angle Ruler or the RECS Tool, this is the same shape as that.
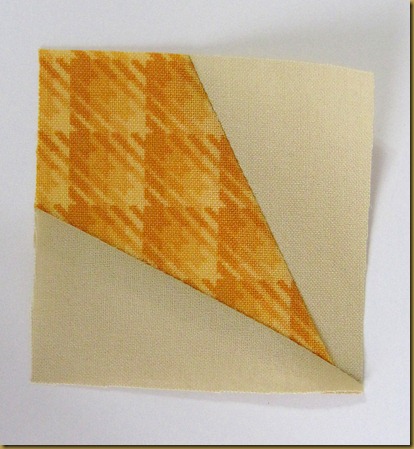
Sew your sides on, press the seams and trim to size. Should finish at 2 1/2” square.
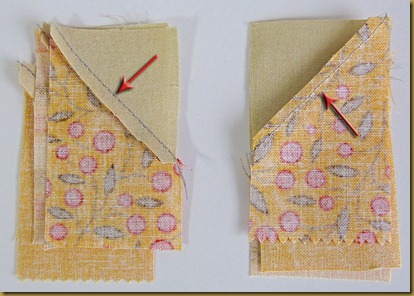
For the pointy strips, you are going to do the corner flip or snowball. Put the 1 1/2” off white square on top of a 1 1/2” X 2 1/2” strip. Sew diagonally. Cut off the corner piece. To make the V’s match nicely, it is helpful to press the seams in alternating directions. They will snug up nicely when you sew.
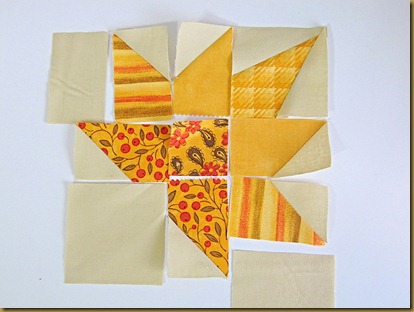
Lay it out and then sew the top row together. Press the seams open.
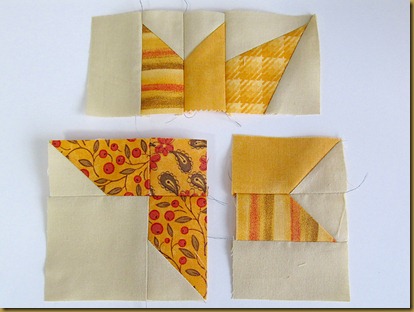
Sew the bottom right four pieces together and press open. Sew the right row together and press open. Sew the bottom two parts together and then add it to the top row. Press all seams open.
I hand stitched some stems in brown. I did them freehand ‘cause I like that.
It may be hard to tell, but I stitched an extra layer of batting down behind each leaf shape. I trimmed the excess off and then made the quilt sandwich. So the little leaves sort of have a little more dimension. I also chose a stipple to help make the leaves stand out.
I love it. It fits perfectly at the front of our TV console. All the TV gadgets sit at the back of the table.
I still had some of the charm pack left, so I whipped up two little Irish Chain table toppers too.
Again, I chose a tight stipple to make the patterned fabric stand out. I really like dimension in my small projects. And I just love to stipple. I don’t know if it makes me strange, but it is so calming for me to do.
My sons even remembered the name of the design to tell their daddy when he got home from work. I love when my family gets into my creations.
Happy Fall!
I'm linking

40 comments:
So beautiful and a great, well-written tutorial. This is on my must-make list!
This is adorable - wish I could manage to keep the table clear enough to use a runner!!! It would be great as a gift, too! I love how the extra batting makes the leaves pop even more.
Wow, those leaves look so beautiful. I love the stitched stem and the quilting really accentuates the overall pattern so nicely. That's really neat how you stitched an extra layer of batting behind each leaf.
Wow Anjeanette! I love it!
Love this great tute! Thanks.
What an adorable tablerunner! Those leaves look so real. Thanks for the tutorial.
Absolutely fantastic! :)
Absolutely fantastic! Love both projects, and I'm all about the extra batting for more dimension - I'm planning to do that on several quilts that are in progress!
These are fantastic! I love fall!
Linda F.
I was just thinking about the season change and the coming colors of fall's beautiful leaves this morning. It was a delight to see your tutorial literally about making leaves on DC Modern's Blog minutes later. Your runner is convincing in a way that made me wonder where you found that leaf print! What those are pieced? WOW amazing how beautifully you managed to capture the shapes and colors and dimensions of leaves. The photos are really good to show how you did it in the tutorial too. Thanks for sharing your creation.
This is gorgeous! Love the details. Thanks so much for linking up to Point of View :)
Incredible, Anjeanette! Love it.
These are gorgeous. One leaf would look great as a coaster/mug rug, I bet!
LOVE these leaves! adding this to my "one of these days" list.
So so cute!! Thanks for the tutorial. :)
This is gorgeous! Thanks for the tutorial! I happen to have that ruler, can't wait to try it!
This is beautiful! I love the different fabrics used on each leaf. You did a great job! Thanks for linking up to Point of View!
Oh, they are both amazing!
Thank you for this great tutorial, your tablerunner is beautiful!
This is gorgeous! I love the leaves! I'm for sure going to have to try this out.
xoxo,
Amy
p.s. thanks for linking up to Point of View.
Hi, Anjeanette! I featured your table runner today: http://www.gwennypenny.com/2012/10/point-of-view-feature-and-theme-for.html
Thanks again for linking up to Point of View :)
I love this tutorial and these leaves, I couldn't resist and pinned
^_^
What a beautiful way to bring a colorful fall to the desert of Arizona! Great tutorial on how to make the leaves. I'm going to have to try to do it. I really like the embroidered stem. I've seen a block with a fabric stem and I like the delicate stem of embroidery. Very, very nice project and your instructions are explicit. Thank you for taking time to create and share the tutorial.
Loving that table runner!! And the sweet little table toppers, too.
Beautiful leafy table runner. Mable leaves is amazaing. Great tutorial to follow and I will put this down on my todo list. I found your blog from Jen @ Quilter in the Closet and happy to find a great tutorial.I am now a follower and look forward to seeing more of your work. Thanks for sharing...Judith, Texas
This is beautiful. Wonderful tut. Thanks for sharing.
Your leaves are wonderful and such a good tut. Thanks for sharing. I am adding these to my to do list.
Thanks so much for the tutorial. Everything is beautiful. Every fall I think I need a leaf quilt. I need to just stop everything and do it. I saw a leaf quilt at the flea market last week... it used lots of scrap fabrics not necessarily what you would think of as fall fabrics but it was fun to look at, Each leaf was the same shape, A large 6" maple leaf type shape,and were appliqued with a loose zig zag stitch. It was hard to leave behind. thanks for sharing. Janita
This is a beautiful table runner and pattern ! Thanks for the tutorial.
I want to try this.
I am a new follower!
Susie
legato1958@aol.com
Wow! Love those leaves!
This is such a lovely tablerunner. I love your instructions - it is a bit advanced for me, but I am pinning it for later. I may make it with all red maple leaves for Canada Day too!
Beautiful work!
So pretty! I love how the leaves pop out!
Wow - all of these projects are amazing!! Thank you for posting and for the great tutorials. I have a question. I'm kind of new to quilting; I'm not at the stage where I can create a block with any shape I want. Instead I applique a shape when I don't have a block pattern/tutorial. Would those leaves look as good in applique and what made you decide to create a block instead of using applique?
Thanks! Again - fabulous work!! Love the Irish Chain pieces too. And you did all of those in a day? WOW! :)
Love them both! Think I might have to try and make them!
Gorgeous work, as always! Your talent never ceases to amaze me! Proud to call you my sister!!
Love,
Becky
Beautiful! They look so "autumn" and gorgeous. Really nice quilting, too! Thanks for sharing!
ola, maravilhoso o seu trabalho amei, já estou te seguyindo e a convido a conhecer meu blog e se tornar minha seguidora, obrigada por compartilhar o pap bjs
What a brilliant table runner! I love that there is a ton of detail in the little leaves, but the overall effect is understated and highlights your fantastic quilting. I love fall, and this is a fabulous interpretation of that time of year.
Post a Comment